Showing posts with label bread. Show all posts

Best Ever Sticky Buns

Monday, June 13, 2011

lovely ain't it? we all went primal the second I serve this buns on the table

all sticky and lovely

sticky buns not yet sticky

Today, i have the baking urge although i am still tired from my fully loaded week from last week. It all started last night when i saw food network when they had this commercial about 'the best ..... I've ever ate' and last night particularly it was about sticky buns. sure enough the featured buns looks so tempting and so VERY sinful looking....

they drench the buns in their specially made 'goo' OVER NIGHT! how crazy is that??? then bake them to perfection (at least that is how it looks like) it really looks tempting but looking at all those 'goo' drenched in the buns i'm thinking 'that buns is going to be SUPER DUPER SWEET and we are not a big fan of Super sweet let alone the super duper sweet. So i though why not just drizzle the 'goo' instead of drenching it? then let it sit for a while then reheat it for a bit and wallah!

And so I did!

And it is Awesome! So here is my version of sticky Bun

7.5g instant yeast
212.5ml luke warm milk
397g flour
1tsp salt
3tbsp sugar
3tbsp EVOO (extra virgin olive oil)
eggwash

1/2c brown sugar + 1tsp cinnamon powder + a handful of chocolate chip= mixwell set aside


mix instant yeast into the milk and let it rest for 5 minutes. set a side.

then mix all other ingredients in your mixing bowl (kitchen aid or kenwood mixer with hook paddle) mix it up as you pour in the milk mixture then the oil.

Mix will until smooth and elastic. then knead it with your hand for 2 minutes then shape it into a ball and let it rest in a greased bowl then cover it with cling wrap/film.

Let it rise in a room temperature for 2 hours. then roll out the dough into a 1/4" thick sheet and lightly brush the dough with water then generously sprinkle brown sugar mixture.

Then roll it tightly to form a roll, with the seam down cut about 1" with a sharp knife. Place the individual rolls into the baking tin. Make sure to leave some space between rolls as it will spread and rise!

cover the baking tin with cling film/wrap to avoid dry skin. Let it rise again for an hour.

just before baking, brush the buns with egg wash. bake at a preheated oven at 180c for 15-20 minutes.

___________________

For the Lovely Goo


5tbsp of brown sugar
3tbsp of sugar
a pinch of salt
2tbsp of butter
1/4c roasted walnuts - roughly crushed
1/4c light golden syrup
1tbsp water

on a medium heat, heat brown sugar, sugar and a table spoon of water until slightly caramelized. then add in butter, let it melt thoroughly then add in the golden syrup, walnuts and a pinch of salt. cook for a while until it slightly thickens.

once the buns has been baked, drizzle on it and let it sit for a bit. reheat the buns in the oven at low temperature before serving.

Indonesian Style Donuts

Friday, April 29, 2011

Yesterday I learned how to make donuts Indonesian style. A friend of mine Ibu Jameela taught me about this particular recipe. It all came up after a casual conversation about Malaysian - Indonesian culinary, then she said "eh aku kepingin donut indonesia disini donutnya ringan bangat kaya ngak punya isi.." (I long for indonesian donuts, here the donuts are too light feels as if no substance) i was naturally stunt by her statement mainly because I don't quite get what she was trying to imply. then i asked for clarification on her statement.

well according to her, where shes' come from (Bali) they make donuts with a bit of potatoes, coconut water, coconut milk... (yes there's the difference between coconut water and coconut milk, which i will explain later) together with other usual ingredients.
First i thought that she might be talking about kuih keria. Kuih keria is a Malaysian snack somewhat like donuts made almost entirely with potatoes.(kuih experts pls correct me if i'm wrong) so i brought her to a street stall nearby where they sells variety of snaks, and showed her the 'kuih keria' but she laughed and said "what is this?" and i was like your donuts lah! she then explains that the donuts that she meant was actually exactly like the usual normal donuts!

she explains, the donuts is the same like any other donuts its just that 'her' donuts is 'fortified' (yes thats her word) with potatoes and coconut goodness, and thats why the donuts will be fluffy yet fulfilling at the same time because of the potatoes, its especially great for breakfast....and i was so enlighten by her description that i want to know how to make it! then i ask why not just make it? she further explained her recipe is for a kilo which means that it'll yield more than her craving requirement. i then suggested to her to make just half the recipe and if its still too much I would willing to take on half to serve my family so no wastage!

then we went to the wet market and get the coconut water and coconut milk. it amazes me that she makes the dough without any sort of measurements to the ingredients and the dough turned out just right. She told me that she used to help her mom to make a whole lot of kuih (indonesian desserts and snacks) to sell. she said that she was poor and every penny earned with blood,sweat and tears. Things turned around after she got married to a 'business man' from Jakarta at age 20. Now her husband passed away and she inherited the wealth, been a widow ever since. I was just happy for her food knowledge...which i intend to learn if she let me.

anyway...here's the 'estimated' recipe. but remember the general rule of making bread dough.
1- the dough should not be too stiff nor to runny/sticky or what not - nothing to the extreme. it SHOULD be soft, not sticky. as soft as your lower part of your ear. - this would mean the liquid part of the recipe is a plus minus depending of the dough consistency, but i will try my best to give accurate estimation?
2- you know that the dough is right when you knead them, it no longer stick to your hands and the bowls.
3- knead well, knead well, knead until elastic!


here's what you need:

500g flour - all purpose flour or bread flour
1/2tsp salt.
2 eggs
1tsp vanilla essence
1/4c sugar
1/2c coconut water (this is a plus minus ingredient please estimate according to your dough consistency)
2tbsp coconut milk
1tsp instant yeast
3 cooked reasonably large potatoes - mashed smoothly

1- combine eggs, vanilla, sugar, salt, coconut milk, mashed potatoes and yeast mix well.
2- then mix in the flour, it will start forming a dough. keep mixing then slowly and gradually add in the coconut
water. mix until you get a soft dough that you can knead. if its too soft just add in a bit of flour but if too
stiff, add more coconut water.
3- then knead the dough well until elastic. we didn't use mixer so what we did was we divide the dough into
2 and knead them separately and we also literally toss the dough around on the kneading table literally to
speed up the kneading process. (if you have mixer JUST use it!its tiring this way) keep kneading until its
smooth and elastic.
4- then let the dough rest and expend for 30-45 minutes or so in a warm place. then punch the expended
dough and knead again then make them into a small balls. then let them rest again for 10-15 minutes
5- then you can start punching a hole in the middle of the balls to make the donut shape and fry them.
6- you can serve them with sugar glaze or choc or jam or what not its yummy and filling. I have them with nutella spread! YUM!

TIPS:
a) its best to mash the potatoes when they are hot. the mashed potatoes will be smoother paste.
b) basic bread guide is applicable in this recipe.

make little balls....
this is how she make the balls...looks easy huh? (FYI thats not my hands, its ibu jameela's)
must make sure that the balls are smooth or it'll break when proofing/frying.
c) regarding the coconut water, its the water from the coconut when you break the fruit not from when extracting it from its flesh, that's coconut milk. the coconut water need not be from a young coconut, it does not matter. According to Ibu Jameela, the coconut water is a fluffing agent for the dough.


really rustic looking donuts

the beautiful glaze harden after a while, it gives you a nice shell...to make glaze just add water to icing sugar until you get a ribbon-ish consistency, then you can either brush on the donuts or just dip it. You can flavor the glaze with a tsp of lemon juice or vanilla essence - its optional....me? i just spread nutella on top and start munching.
glazed donuts yum~


these are how the donuts actually look like under a natural hot sunlight ...not bad huh? no molds required, yet it looks decent.

Hi fiber bread/ loaf

Tuesday, November 17, 2009


first of all i'd like to apologize on the fugly pictures its been raining and gloomy lately its no condition for picture taking so please bare with me...but i can promise you this though that this is a great healthy bread recipe and a MUST TRY. with this same recipe you can ,make variations its so wonderful!

ingredient (A)
200g bread flour (you may also use all purpose flour)
50g bran mix
25g wholemeal
10g sugar
1/2tsp salt
2tsp instant yeast (my fave brand is saf instant they never fail me)

ingredient (B)
1.5tsp honey
170ml cold water or milk

ingredient (C)
2tsp shortening (you can use butter instead it gives better taste but texture wise shortening somehow gives more fluff so its your pick)

optional ingredient (D)
35g chopped walnuts or pecans or seeds what ever tickles your fancy

bread making:

  1. mix ingredient (A) then add (B) in your mixer with bread dough fitted blade (just in case; its the one that looks like a cork screw), let it knead or mix to form a dough.
  2. add (C) and continue kneading until its becomes smooth and elastic dough.
  3. then add (D) and mix til combined.
  4. cover dough with clear film and let it rise in a warm place for 45minutes to 1 hour or until it doubles the size.
  5. divide the dough into equal pieces, mold them into balls nad leave them to rest for a further 10 minutes.
  6. then as you would when making white bread, flatten the dough and roll it and give it a firm roll to make sure that the seams won't break during baking and coat them with some flour and put them on to the parchment paper make sure that its seam side down.
  7. let them proof for another 40 minutes. the last 10 minutes preheat oven at 200c
  8. then use a very sharp knife to cut out leaf shape (as per photo)
  9. bake at 200c for 25 minutes.

TIPS:
  1. when ever making bread it is often a MUST to make sure that at the end of the kneading that the dough become elastic. its important because this is the key for a long lasting softness of your bread. if you have that moment where yor bread is only soft freshly from the oven but when cooled it turned as hard as a rock? this is why. so please its important!
  2. what do i mean by elastic? to test, rub your fingers with some oil or butter and try to stretch the dough if its breaks easily then there's a whole lotta kneading to do but if its streacthable to a thin film like then that's elasctic.
  3. ample proofing is also a must for a soft and fluffy bread so don't be a smart ass and reduce the proofing time.
for variations:

A) for rye bread - omit the bran mix add 50g of rye flour and the rest is the same

B) white loaf - use 250g of bread flour instead of 200g bread flour omit wholemeal and bran mix.

Vanilla Sugar Sweet Bun

Monday, March 30, 2009


ahhh~ its been a while since i last blog in here...in case you're wondering i'm still around (online) its just that lately i haven't actually cook anything and even when i did i somehow didn't manage to take any picture..its always either i'm busy or my phone battery is out or i'm just plain lazy...*yeah i'm only human..its just one of those days..* i'm lazy mostly because i still haven't replace my old handphone cable so right now i have to transfer my pictures from my phone to my hubby's notebook via bluetooth *haha don't mock me...coz i'm still using an ancient desk top, this baby was bought with my 1st ever pay cheque so its sentimental* then transfer into my pendrive then into my desktop..thats a lot of work you know....*longggg sighhh~*

anyway my body is still aching from last week outing...yeahhh i had a how do i put it...adventurous and exiting weekend *giggles* my brother organized a paint ball game through facebook and its was great at first coz alot has sign up but then only 7people turned up as most of them had something to do last minute. nontheless it was great..i had alot of fun! it was my first time playing paintball...the adrenaline rush, scared to be hit, i feel like i was really in a war zone...its just FUN...i haven't had this much fun in the longest time...at the end of the day we all had multiple bruises on our body. we looked like we've been abused or something its wicked!

anyhow... back to my baking activity...today i wanted to make sweet buns, i have my own recipe but mine is actually for commercial so the recipe is in super large quantity and i was too darn lazy to divide bla bla so i googled sweet buns and i found this wonderful recipe which i really wanted to share as it was fantastic. its a bit tidious to do but its all worth it, its called Vanilla sugar sweet bun there's a step by step instruction for you to follow. pretty cool site... the reason that i wanted to make sweet buns out of the blue is that i was given this okra powder. its for me to test and try in a bakery product. this Okra powder is used to reduce the glycemic index in breads or cakes or any food for that matter. Highly recommended for those who is suffering from diabetic or for those whos counting calories *wink*

so today i made the sweetbuns with some altercation in the recipe. waht i did was:-

  1. add Okra powder 2tbsp
  2. I don't have vanilla pods (its freakishly expensive here) so i use vanilla essence to infuse into the sugar. you take the amount required in the recipe then add in few drops of vanila essence then stir to evenly coat the sugar. let it sun dry for at least 1-2 hours. then ready to use. this is the same technic to use if you wanna make your own colored sugar. you can actually substitute vanilla flavoring with pandanus (screwpine) flavor or rose or butter milk.
  3. i use high protein flour instead of all purpose flour.
and everything else is the same.

the verdic? it turned out great! Its actually similar to cinnamon bun only that i personally like this one better coz i'm not a big fan of cinnamon. Although i think the bread will look alot better if i were to put it individually, like in a paper cup or something...*putting this in my mental note*
My family loves this buns, its super soft, the Okra powder did not effect the taste of the buns just a slight coloration, it made the bun looks wholemeal...thats all...

so here's the recipe but the detailed instruction you can just go to the website and see.

Ingredients

Dough:

  • 1 cup milk
  • 1 vanilla bean or 2 tsp vanilla
  • 1/2 cup )melted) butter
  • 1/3 cup vanilla sugar
  • 2 eggs (beaten)
  • 2 teaspoon instant yeast
  • 1 teaspoon salt
  • 3 1/2 - 4 cups all purpose flour


yoo tiaw aka cakoi

Thursday, December 11, 2008


currently this is my family's fave food right now...especially my parents they absolutely loves it. it all started when they or we had our eyes checked out in mid valley. we were hungry and looking for something to munch while waiting for my brother and sister eyes being check and we saw this i love yoo stall they specialized in yoo tiaw/cakoi and their cakoi is really good during lunch time their stall were always packed they also serve porridge i.e dried scallop and dried oyster porridge and they were good too. the cakoi is served with warm soya milk or porridge. we've tried both and we love it!!

and i personally think that my parents are addicted to it *lol* coz everytime they were there or in pavillion its a must buy item...so due to this craziness of yoo tiaw or cakoi i went online searcheing for a great cakoi recipe and i found one at MYR by skyblue. it definately turned out great..my only complain is that the dough is very soft and hard to work with! nontheless my parents loved it they finished it in a blink... now thats a REAL compliment!

here's the recipe from MYR by skyblue

  • 1 c water
  • 2 c bread flour
  • ¼ tsp instant yeast
  • 1 tsp sugar(i put 1 tbs of sugar coz i like it slightly sweet)
  • 1 tsp salt
  • ¾ tsp alum / tawas
  • ½ tsp baking soda
  • ½ tsp ammonia atau Nutre Powder
  • 1 tbs vege oil
  • oil for frying
  • sesame seeds for garnishing

how you do it...

  1. Add in all ingredients and knead using dough blade until smooth and elestic. when done, take the dough out and hand knead it for a while and use some more flour coz the dough is very soft. divide dough into 2 parts and roll it into a 40cm long dough. close it with a plastic wrap to let it rest for about 45mins or until it doubles the size.
  2. when done, level the dough with hands and let it be about 1cm high and 5-6cm thick. cut into a 2.5cm long and let it rest again for another 10-15 mins.
  3. Imgp0934
    Heat oil to deep-fry with a small heat. take a dough and sprinkle or spread a bit of water using a bambo skewer as per picture.
  4. Imgp0935
    put another dough on top and press inthe middle of the dough with the skewer to dent it a little.(this will stick the dough together and make it look like a bone like bread)
  5. Hold at both ends of the dough and stretch it gently then toss it in the hot frying wok/pan. Stir it a little when it starts to float so that it'll expend more and fry until golden brown

i sprinkle some sesame seeds on the dough when resting it at the final stage.. this is optional...

aparently skyblue is actually lydia ehheeheheh i didn't know and i got the recipe from MYR (my resipi) not from her blog so i didn't know but the original posting is at her blog http://mykitch3n.blogspot.com/2007/03/blog-post_22.html <--i sure do hope that this can be link to her blog coz i've tried severl times but failed...if this didn't work just copy n paste the url do it old skool ;p

pillowDOUGHNUTS

Wednesday, October 22, 2008


This is great for tea time...we had this with a cup of coffee and it was oh so satisfying... you should try coz its easy to make
what you need...
31/2cups flour
1/2cups or castor sugar
1/2tsp salt
4tbsp soft butter
3/4tsp active dry yeast
11/4cups of milk
1/2tsp vanilla
2eggs

This is how you do it:

  1. heat milk then stir in yeast and sugar, let it set/bubble for a while
  2. then mix all the remaining ingredients and blend in a mixer for about 5 minutes or until the dough is no longer stick to the bowl.
  3. Place the dough in an oiled bowl and let it rise for a bout 45minutes or until doubled.
  4. then lighlt flour the table surface and start rolling. simply cut the dough then fry until golden brown.
  5. sprinkle or dust with icing sugar, ready to serve
Tips:
  • The dough is very soft so don't worry just work with it with a little bit of flour as you go along.
  • this recipe can be use for sticky bun recipe.
  • this doughnut recipe can be made earlier and kept frozen for future use...how great is that??

Steamed Buns for Breakfast anyone?

Monday, August 18, 2008

The buns before steamed

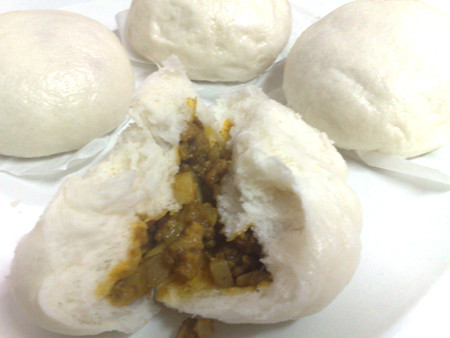
Today i'm in the mood for Steamed buns...so i woke up very early in the morning to make some (coz yo know making steam buns is easy but like any bread it takes some time making it..) I've made steamed buns with curried chicken fillings and plain old steamed buns called Shanghai Buns eaten with blackpepper chicken dip...yummm~just talking about this makes my tummy rumbles coz i love steamed buns any way there's the recipe if you wanna try making it... by the way i owe this recipe to Lina my trusted cooking teacther *wink*

Steamed Buns:

Dough

(A) - Sift all ingredient A
350g Hong Kong flour / Pau flour
1tsp double action baking powder

(B)
1tsp instant dry yeast
1tbs shortening

(C) - Combine and set a side
200ml lukewarm water
40g castor sugar
1/4tsp vinegar

This is how you do it:

  1. Before you start cut 10 pieces of parchment paper about 5cm x 5cm, set a side
  2. Put (A) in the mixer then add (B). mix usung dough blade
  3. Gradually add (C) until you'll get a soft dough.
  4. Remove dought put in basin, cover & let it rise for 15 minutes.
  5. Once it rised punch the dough down and knead on a table surface to form a long roll
  6. Cut into 10 even pieces.
  7. Roll the individual piece making it a flat disc, add in the fillings then close/wrap it as you would when making a pau, when done place it on a cutted parchment paper.
  8. For Shanghai buns, from 1 pc of dough; divide into equal 3 pcs.
  9. Roll all 3 making it like a string about 10cm or so (if you can make it longer without breaking it the better), then spin it together so it'll have a swirl like design (this is hard to explain, should've take some pictures making it) -or better yet, you could just roll and make it it like a cinnamon roll bun... maybe when you look at the picture you'll have the idea...
  10. Let all the prepared buns rest and rise of another 12-15minutes.
  11. Ready to steam
Curried Chicken filling:
What you need:-
300g chicken meat -diced
200g diced potatoes - boiled until tender then set a side
100g blended onions
1tsp grated ginger
1clove garlic - to be blended together with the onions.
2tbs of curry powder
1tbs of chilli powder / chilli boh- optional (i didn't add this)
Salt and sugar to taste.
oil for frying

How you do it:
  1. Heat oil at medium heat, then fry the onion mixture, ginger and curry & chilli powder until fragrant about 3-5minutes.
  2. then add in the chicken meat, cook until the chicken meat is almost done then add in the boiled potatoes.
  3. Stir and add the seasonings (salt and sugar) to taste. Keep on stiring until all the ingredients are well cooked.
  4. Spread it in a tray to cool it off before you add in the buns.
Blackpepper Chicken:
You'll need:
300g Chicken meat - diced and season slightly with salt
mix vege about a handfull
1 clove of garlic - chopped
11/2tsp of cornflour mix with 4tbs of water

Seasonings:
1tsp Dark soy sauce
1tsp of Oyster sauce
a dash of sesame oil
a generous amount of blackpepper
salt and sugar to taste
oil to fry

How you do it is..:
  1. heat oil, and fry the garlic until slightly brown
  2. add in the chicken meat, fry until half cooked
  3. add in the mix vege, stir.
  4. Add in all the seasonings, stir and let it simmer for a while.
  5. then add in the cornflour mixture. cook until the sauce is thicken.
  6. ready to serve.
Shanghai bun with black pepper chicken