this is such a topic to write about. i'm sure this entry will be somewhat useful to my readers or those chef wannabes (no puns intended)
herbs derives from leaves of plant and they gives great contribution to our cooking as well as medicine. to point which is better dried or fresh is very much debatable because it depends on what type/king of cooking/dish you are making. but one thing for sure, dried herbs tends to have STRONGER flavor than fresh herbs. so when cooking, with fresh herbs we tend to have to use more; the ratio would usually be 1 table spoon of fresh herbs to 1 teaspoon of dried herbs.
although the type of cooking you're doing is also a major factor in determining the out come of a dish with herbs. for example; if you're cooking stews or soups or any dish that requires longer hour of cooking, add herbs in the beginning may cause lost of flavors so many cooks/chef would reasonably advice to add herbs towards the end of the cooking for maximum flavor. but if you're making chilled dish perhaps putting the herbs early is a good idea as it will slowly incorporate its flavor to the dish.
so dried or fresh? to me both are equally wonderful although dried herbs are very convenient especially to us Malaysian where fresh herbs such as tarragon, oregano, sage just to name a few are hard to find.
Fresh herbs is wonderful but i find it hard to keep it fresh for longer than a week. i suppose its due to our climate. i love fresh herb but they're expensive and hard to keep (do you have the same problem?) i remember when i was in the UK i used to keep my herbs clean (cut the stems,clean damaged leaves) and in a glass, it lasted for weeks but i can't do that here it wittered just within 2-3hours. for my love of fresh herbs i grow my own (i have anna olson to thank for that)
dried herbs are exceptionally convenient and a lot cheaper than fresh herbs. plus when you buy fresh herb you have to buy in stalk or a bunch while you only need some. and keeping it is a bitch (opps pardon my french =D )...unless you grow your own herbs then that's fine. but when buying dried herbs look for ones that still have color in it. i mean the green color on dried herbs still look fresh and not brownish. brownish herbs means 'old' or stale herbs which may have less flavor(so you won't get your money worth) if you so happen to have stale herbs, its still usable only you would probably need more than the recipe required. to release the aroma and flavor of herbs rub the dried herbs between your hands or grind them before you toss in your dish. to check if your herb is fresh when you rub with your fingers you should smell a rather strong aroma otherwise its time to throw out your stash.
so dried or fresh...i suppose its a matter of taste...
hope this entry is useful for you. happy cooking!
Herbs: Dried vs Fresh
Monday, March 8, 2010
Posted by lynnfathil at 9:24 PM 1 comments
Labels: Kitchen Tips and Fixes
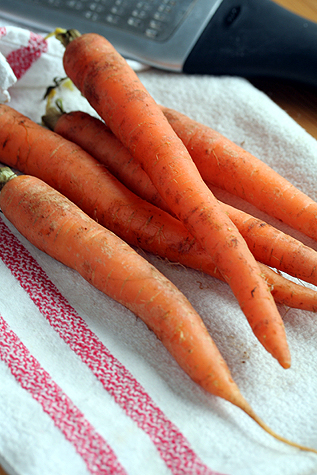
carrots: how to choose
i'm backkk... (imitating oprah) =D
firstly i'd like to apologize to my fellow followers/readers on me not updating my blog. as you know i take pictures with my camera phone, and by now i have one too many food pictures that i'd like to share with you all but yet again i'm having problem transferring the pictures. i have the usb cables and everything only that my husband's laptop did not accept my transfer and i've tried so many times on configuring the laptop but still failed (argh...roll eyes)
but i've manage to borrow a camera from my parents and will see from there (which also means that i have to start cooking and baking all over again) so mean while, i'd like to entertain you with my tips and just a few things that i've learn over the years about choosing fresh ingredients accompany by pictures i've gathered from the net (don't worry i shall put the link on where i get the picture from) and some from my picture bank, and this time to subject of the matter is carrot! yes CARROT...
why carrot? its simply because its the most neglected vegetables ever...so from now on, no more taking this vegetable for granted ok? right...i say neglected because we always 'choose' our carrots simply by the fact that as long as it has no rotten parts and they'll make their way to our kitchen and most of us...well at least us Malaysian, we tend to choose a very huge and plump carrots that sometimes to me they can actually pass for cucumber if only they are green...(then again who could blame them, they usually only sell huge plump carrots)
the french, they basically hate unreasonably huge ingredients. because to them, the bigger the ingredients are the less taste it will have. And i find this especially true, i can't remember the countless times that we ordered something that is huge like huge garoupa fish for family dinner, huge squid for bbq etc and all of these was basically tasteless and rather chewy which was horrible and not to mention expensive. so from those unforgivable mistake for a foodie like me, i learn i'd rather order several fish or squid of what ever than having just one huge ingredients... with that, we tend to appreciate the food better
so the same principle applies to carrots. the bigger they are the lesser the taste will be and if you are unfortunate it'll be bitter if not any. i used to pick big carrots because...lets face it we think that its value for money. but we sacrifice the taste and probably the nutritional value as well in the process.
the french carrot: this is how carrot should be thin, slim and rather petite in size. this type of carrot is always sweet and have such great flavor. as the french chef say " this is how carrot should taste .."
just a comparison, find the regular large malaysian carrot, the slim petite carrot , taste it and you know that there are such a difference in the taste. the petite carrots tends to taste sweet and have that significant 'carrot' flavor rather than the larger carrots. with this type of carrots you'll make a very tasty stew or soup with its natural sweetness and all...this i assure you.
what about baby carrots? ones that are sold ready to eat carrot in a packet? ahhh~ that to me is the genius of marketing. most of them are just large/full grown carrots cut and made into 'baby' carrots and market it/ sell it as 'baby carrots' altho some of it maybe actually young carrots and probably taste just as sweet but generally to me nothing is better than the slim carrots.
why is the slim carrots are so tasty?? hmmm....why? well simply because it is not a mature carrots! its YOUNG carrots. Hans they are slim...(wink) so again this slim carrots are the sweetest of them all! and if you want a longer lasting carrots choose those that still have some green in it.
there are also some other pointers on what to avoid in choosing carrots (other than what i've been blabbering about):-
- blemishes or cracks (which most large full grown usually carrots have)
- flabby, rubbery or soft
- sunburn green at the top (this one always have a special appearance in the market so becareful)
- rather than anything else wrap carrots using bubble wrap the small kind of bubble wrap as this will ensure freshness and prevent it from being rotten
- never NEVER use plastic bag to store your carrots or other vegetables...for God sake! this will rote your vegetables in no time
p/s: this is just the general rule on how to pick a better tasting carrot.
Posted by lynnfathil at 10:50 AM 0 comments
Apple pie - lattice top
Thursday, February 18, 2010
just last week (during the lonely CNY) i finally have the mood to bake...mmm i'm sorry for letting this blog go idle for a long time, but i was kindda busy...or more accurately in a vaca mode ^_^
i went to Bandung with my parents and sister and her fiance...she wanted to look for her wedding invitation card coz apparently our printers can't print less than 3 weeks their estimation time was 4-6 weeks! due to CNY holiday bla bla...and my sister's wedding is set in April! then we heard that Indonesian can handle fast printings minimum of 3 working days...how great is that? so without thinking we all book ourselves tickets to Indonesia...for me, i was there just to have a shopping frenzy...and the result is that i'm broke now...i can literally see my card puffed with smoke =p...hubby wasn't that happy too and that's my dear is why i'm baking stuff ...you may say that this is my rather pathetic attempt to cheer him up hehehehe~ which by the way worked like a charm!!! (then again he always smiles whenever i put effort-ful (is there such word?) homemade food on the table)
anyway... this apple pie is one of my attempt to put back smiles in his face....coz i know that hubby loves apple pie especially when topped with vanilla ice cream!
Apple pie fillings:
5 medium sized granny smith green apples - peeled and cut into wedges
1/2tsp cinnamon
1/2tsp nutmeg
1/2cup brown sugar
1tbsp lemon juice
3tbsp flour or custard powder
30ml water (plus minus this will depend on how loose you want your filling be)
- combine all ingredients and cook until the apples are almost tender. adding water gradually controlling consistency to your liking. then remove from fire let it cool.
- it is important that you don't over cook your apples or it'll loose its flavor.
Flaky Pie Crust Recipe
- 3 1/2 cups all-purpose flour
- 1 tsp salt
- 1/2 cup solid vegetable shortening
- 1/2cup cold unsalted butter cut into chunks
- 1tsp salt
- 1tsp sugar (this is optional)
- 3/4 cup ice water
How To Make a Perfect Flaky Pie Crust
1st Step:
- Measure flour and salt into a large bowl making a well in the middle. Put shortening and butter into the well.
- This is an important step. Do not let the heat of your hands melt the shortening. The least amount of contact with the shortening the better. i use pastry cutter for this step. you need to work on it coating and cutting the butter and shortening with flour until...
- It should look like a small peas, with the butter and shortening being totally incorporated into the flour.
2nd Step:
- Pour water bit by bit, until it comes together in a soft dough. You may need more or less water depending on the humidity. Do NOT knead the dough as in bread making though as this will encourage the formation of gluten which we don't need.
- Work the dough and form in a ball and flatten it to a disk. this is to ensure an even chill.
- Cover the dough and refrigerate. let it rest for at least 10 minutes.
- you may keep longer than 10 minutes. i usually make a large batch and keep the balance for future use. the dough keeps well in a zip lock bag up to a month.
- Take a handful of flour and throw/sprinkle it down on a counter top. Put the dough in the middle of the flour.
- Coat your rolling pin with flour. Start rolling the dough with the pin, turning the dough to get a round shape. This may take several passes over the dough, turning this way and that. Flip the dough over carefully, adding flour to your surface as needed. Finish rolling on this side to make a circle that is 4" bigger than your pan.
- Fold the dough in half, place it in the pan unfolding to fit. Trim if necessary, but not too much. You want to have enough to fold the edges under.
- Fold the edges under, turning the pan and pressing the edge as you go.
- You now have a choice as to how you want to finish the crust. If you are making an open pie as in pumpkin or pecan, press the edges down with a fork to seal the edge and give it a nice pattern.
- Or, you can crimp the edges using your thumb and forefinger of your left hand and the forefinger of your right hand, and go around the edge of the pie making a v-shaped pattern, all the while keeping the edge slightly higher than the pie pan.
- or in my case i just let it hang a little, then i start working on my lattice top then will i trim the edge for a clean finish.
- at this point you may have some extra dough, roll it and stamp it with you fave cookie cutter and make decorations on top of your pie...
- use 1 egg yolk + 1tbsp of water and a drop of egg yolk coloring for glazing.
- bake at 180c for 30-45minutes or until the pastry is golden brown.
if you want to learn on how to make this elegant dessert click here for a step by step instruction.
p/s: happy Chinese New year to all my fellow Chinese friends
Posted by lynnfathil at 2:45 PM 0 comments
Labels: dessert
Fried Fish with Fermented Soy Bean Sauce (ikan masak tauchu)
Monday, January 18, 2010
- season fish with salt then fry them til cooked and tender. set a side.
- heat a table spoon of oil and saute onion, garlic, ginger, chili, tomatoes until fragrant.
- then add in tauchu, stir and reduce heat to moderate to low, add in the soy sauce.
- then add in water and corn starch mixture.
- cook until its simmers and the gravy is slightly thicken. remove from heat then pour the gravy on to the fried fish and ready to serve.
Posted by lynnfathil at 10:38 PM 2 comments
Labels: Seafood
Aztec Cookies: Deep Chocolate & Green Tea Cookies
Friday, January 15, 2010
- to have a nice round shape i find that you should chill the dough first before you cut it (i didn't so my cookies are a tad bit out of shape.
- then you a VERY SHARP knife to cut the dough to ensure a clean cut
- and dust some flour on your work space when rolling the dough to avoid sticking.
Posted by lynnfathil at 6:54 PM 0 comments
my sister's engagement
Sunday, January 10, 2010
*taking a very deep breath* finally i can rest!
today is my sister's engagement day.to all my foreign readers here in Malaysia, the malays take engagement seriously and there will be an event by itself only it is usually an intimate occassion amongst family and close friends. so my baby sister is officially engaged today and it was an excellent event with great food and all. Everything falls into place last minute...(aha..there's a story behind it)
ok ok. ever since my sister is getting married we've been planning her whole occassion since september last year...*paused* i think and i was assigned to do nothing at first. my sister had her own ideas for her doorgifts, alter ect...then come x-mas and the seasonal candy cain is very tempting then came the idea of giving away the candy cains as favors, engagement favors. my sister exitedly bought 12 cartons of candy cains adding up to 200pcs in total....thennnnnn....~
the unfortunate happens when the darn candy cain melted.
then that one fine day mommy dearest called and panicly requested me to make something as favors and later we agreed on decorative cuppies. but i also baked some gorgeous laced cookies its a doily inspired cookies and its absolutely scrumptious. baked the cookies 3 days in advance with 3 flavors mocha, almond and hazelnut.
ahem *clears throat* needless to say it was a hit (yes i'm particularly proud of myself) and got so many orders for the cupcakes and cookies to the extent that i have to reject some of the request...errr...sorry...
mmm..there are also other story about the hantaran cake/fondant cake my sister ordered from our local cake store sugar****** which turned out something totally different from her request but oddly my sister paid the lady anyway (please note that i was not there when she ordered the cake or else i would've shout and screamed at the idiots that improvising the cake without consulting the us; the buyer first) my sister spent almost the whole day crying yesterday and i tried to do something for her but it was too late..literally late for 2 reason 1: limited ingredients 2: its was already 8pm and i was soooooooooooooooooooooooooooo tireddddddddddddddd....err notice the extra Os?
but even with all that the event turned out great...nonthe less , thank GOD!
Posted by lynnfathil at 9:26 PM 3 comments
Baked me own B'day cake: Double Chocolate Peppermint Sponge
Wednesday, December 30, 2009
- pre heat oven at 180c. grease two 20cm/8" sandwich cake tins
- sift flour, cocoa, baking powder into a bowl set aside.
- melt butter and chocolate chunks and set aside.
- in a mixer fitted with a whisk beat eggs with sugar until volumed and pale.
- lower the speed, and add in the flour mixture just until almost mixed.
- then add in the butter mixture and gently fold in the butter until JUST mixed! (coz we don't wanna loose too much air)
- pour into the prepared baking tins and bake for 25-30minutes or until set. DO NOT OVER BAKE THE CAKE or it'll be dry!
- once cooked, let it cool just for a bit then turn out and finish cooling on the wire rack
- Sandwich together the cakes with the chocolate spread, then drizzle more on top to decorate.
for the spread :
i simply melt (using double boil method) beryl's dark chocolate about 100g-150g or so, then i add in 1/4c of whipping cream, 1tbs butter, a 1.5 tsp of light corn syrup and 1/2tsp of peppermint essence. mix well and ready to spread!
Posted by lynnfathil at 12:54 AM 1 comments
Labels: cake