Peanut Butterscotch Cake

Saturday, August 23, 2008


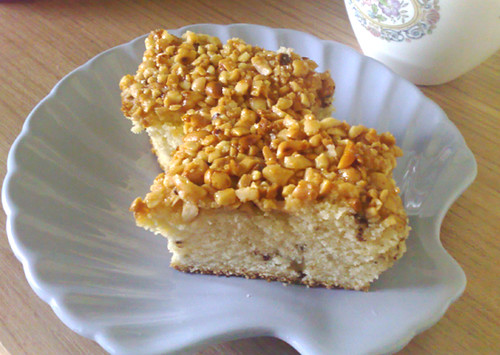
In all honesty, this may be the best cake i've ever eaten...i didn't make it but my sister did...notice the nick avsolut? yup thats her...i'm actually surprised that she can bake a cake and it turned out good *nods* then again she has always been a fantastic baker...especially with cookies! (when i say fantastic mean that she rarely bakes but when she's at it her bakes always and i mean always turned out right and to say the least 'delish'!) there was this one time that she bakes chocolate chip cookies and guest what? her cookies tasted like Famous Amos...no kidding...until today i keep asking her for the recipe but she kept saying that 'its chef's secret' fuewy...i really wanna get my hands on that recipe...then again i supposed that she discover the chocolate chip cookies by accident and then she didn't remember it...is that possible?maybe...

anyway..enuf about her... here is the recipe...and i don't have the whole cake picture and my sis's picture is too blury for me to even consider putting it here...you can just drop by to her newly start blog at http://avsolut.blogspot.com

Topping:
125g butter
2 tbsp brown sugar

2 tbsp white sugar

2 tbsp honey

1 1/2 cups of finely chopped peanuts


Cake:

1 2/3 cups plain flour

1/2 tsp salt
3 tsp baking powder

125g butter

1/2 cup sugar

2 eggs, beaten

1/4 cup milk
1/2 tsp vanilla extract

- Lightly grease 23cm square tin and line base with non-stick baking paper

Topping
-
Melt butter, sugars and honey in saucepan. Stir in peanuts pour mixture in tin.
- Preheat oven 190 C
Cake;
- Sift flour, salt and baking powder. Rub in butter, add sugar and mix. Pour eggs, milk and vanilla extract in center. Mix well. - Pour cake mixture on top of nut mixture. Bake for 40mins, then reduce heat to 180 C and bake for 20mins more. Turn out immediately onto rack and remove paper. - Replace any nut topping that comes away, it will set as soon as it cools.

p/s: she add in some chocolate rise in the cake mixure for kicks...
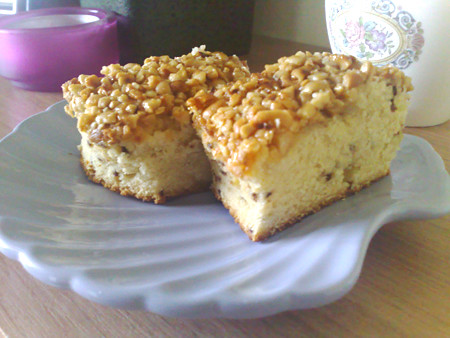
Mini Serving Plate up for sale

Friday, August 22, 2008


This is a mini serving plate (piring hidang) Shell design in Soft Blue color(i'm sorry about the picture quality, the blue is almost violet). Microwave safe. Its only RM10/pc. the Stock is limited.

Outing to Mahkota Chinese Restaurant

yesterday, my family and i went to a Chinese restaurant at Mahkota Ceras. i heard that the food there was good especially the chicken rice (my sister in law ta pau the chicken rice n i've tasted n its delicious) so i thought that we should give it a try...

sooo the verdic is....

The service:
it was less than satisfying...VERY SLOW we were very hungry as we've waited for almost 2 hours! and the food was not those that have to cooked fresh its pre cooked, its Nasi Ayam for God sake! the chicken was hanging there waiting to be eaten...our BBQ Pau took 45minutes to be served to the table...i mean what was that all about? there were not many customers at the time it the excuse was busy serving other customers... that was horrible to say the least. and the worst part was that we didn't get what we've ordered...we got something else. but my mom was soooo hungry that we decided that to let it be.

The food:
The Chicken rice was Good not that great i think the Bukit Bintang Chicken rice tasted wayyyyyyyyyyyyyy better! (its wierd that the one i've tasted from my sister inlaw was different) my sister...pitty her..she ordered Spicy Chicken Rice (Nasi Ayam Pedas) and it was tasteless ...
The price:
Not very cheap...we all thought that it was not worth it considering the bad services and all...

so with the late service and all my mom told me "please don't bring me here again!" (boy that must have been very unpleasant for her)

and now i here by give this restaurant 3 St*Rs . i'm giving face because the restaurant is new it was only open for less than a month...i would love to promote this restaurant but i simply can't lie...i feel obligated the customer service need a lot of work...food quality must watch out too.

The Chicken Rice Stall...
This is basically how the restaurant look like...
The Chicken Rice...

Siew Mai Dim Sum

Spicy Chicken Rice

Steamed Buns for Breakfast anyone?

Monday, August 18, 2008

The buns before steamed

Today i'm in the mood for Steamed buns...so i woke up very early in the morning to make some (coz yo know making steam buns is easy but like any bread it takes some time making it..) I've made steamed buns with curried chicken fillings and plain old steamed buns called Shanghai Buns eaten with blackpepper chicken dip...yummm~just talking about this makes my tummy rumbles coz i love steamed buns any way there's the recipe if you wanna try making it... by the way i owe this recipe to Lina my trusted cooking teacther *wink*

Steamed Buns:

Dough

(A) - Sift all ingredient A
350g Hong Kong flour / Pau flour
1tsp double action baking powder

(B)
1tsp instant dry yeast
1tbs shortening

(C) - Combine and set a side
200ml lukewarm water
40g castor sugar
1/4tsp vinegar

This is how you do it:

  1. Before you start cut 10 pieces of parchment paper about 5cm x 5cm, set a side
  2. Put (A) in the mixer then add (B). mix usung dough blade
  3. Gradually add (C) until you'll get a soft dough.
  4. Remove dought put in basin, cover & let it rise for 15 minutes.
  5. Once it rised punch the dough down and knead on a table surface to form a long roll
  6. Cut into 10 even pieces.
  7. Roll the individual piece making it a flat disc, add in the fillings then close/wrap it as you would when making a pau, when done place it on a cutted parchment paper.
  8. For Shanghai buns, from 1 pc of dough; divide into equal 3 pcs.
  9. Roll all 3 making it like a string about 10cm or so (if you can make it longer without breaking it the better), then spin it together so it'll have a swirl like design (this is hard to explain, should've take some pictures making it) -or better yet, you could just roll and make it it like a cinnamon roll bun... maybe when you look at the picture you'll have the idea...
  10. Let all the prepared buns rest and rise of another 12-15minutes.
  11. Ready to steam
Curried Chicken filling:
What you need:-
300g chicken meat -diced
200g diced potatoes - boiled until tender then set a side
100g blended onions
1tsp grated ginger
1clove garlic - to be blended together with the onions.
2tbs of curry powder
1tbs of chilli powder / chilli boh- optional (i didn't add this)
Salt and sugar to taste.
oil for frying

How you do it:
  1. Heat oil at medium heat, then fry the onion mixture, ginger and curry & chilli powder until fragrant about 3-5minutes.
  2. then add in the chicken meat, cook until the chicken meat is almost done then add in the boiled potatoes.
  3. Stir and add the seasonings (salt and sugar) to taste. Keep on stiring until all the ingredients are well cooked.
  4. Spread it in a tray to cool it off before you add in the buns.
Blackpepper Chicken:
You'll need:
300g Chicken meat - diced and season slightly with salt
mix vege about a handfull
1 clove of garlic - chopped
11/2tsp of cornflour mix with 4tbs of water

Seasonings:
1tsp Dark soy sauce
1tsp of Oyster sauce
a dash of sesame oil
a generous amount of blackpepper
salt and sugar to taste
oil to fry

How you do it is..:
  1. heat oil, and fry the garlic until slightly brown
  2. add in the chicken meat, fry until half cooked
  3. add in the mix vege, stir.
  4. Add in all the seasonings, stir and let it simmer for a while.
  5. then add in the cornflour mixture. cook until the sauce is thicken.
  6. ready to serve.
Shanghai bun with black pepper chicken